Archive for XML

SharePoint: Content Query Web Part, more than three filters, QueryOverride and Logs

Scenario:

We need to get list items from all lists in a site collection based upon five conditions. OOTB content query web part (CWQP) provides three filters at max. The way foreword is to write a CAML query and put it inside QueryOverride property. To do this, you need to export OOTB CQWP web part. Open it in notepad or any XML viewer tool and set the property.

We wrote following CAML Query and set the QueryOverride property.

<property
name=QueryOverride
type=string ><![CDATA[

<Where>

<Or>

<And>

<And>

<Eq>

<FieldRef
Name=AnnouncementPropagate
Nullable=True
Type=Boolean/>

<Value
Type=Boolean>1</Value>

</Eq>

<Eq>

<FieldRef
Name=Region
Nullable=True
Type=Choice/>

<Value
Type=Choice>XXXXXXX</Value>

</Eq>

</And>

<Gt>

<FieldRef
Name=Expires
Nullable=True
Type=DateTime/>

<Value
Type=DateTime>

<Today/>

</Value>

</Gt>

</And>

<And>

<Eq>

<FieldRef
Name=Region
Nullable=True
Type=Choice/>

<Value
Type=Choice>
XXXXXXX</Value>

</Eq>

<Gt>

<FieldRef
Name=Expires
Nullable=True
Type=DateTime/>

<Value
Type=DateTime>

<Today/>

</Value>

</Gt>

</And>

</Or>

</Where>

]]></property>

An Or operator with three and two ANDs. Uploaded the web part and selected first option “Show items from all sites in this site collection”. After clicking “Apply”, web part display following error:

There is a problem with the query that this Web Part is issuing. Check the configuration of this Web Part and try again.

Resolution:

Tried different options and found out if we select a single list, web part works fine and if we select other two options, web part display above error.

SharePoint write the actual query created by selecting filters in the tool part of CQWP to the LOG file. So, we first configured three filters for three AND’s and copy the query from the Log file. Then, configured two filters for two ANDs and copy the query.  Joined them with Or and it did the trick.

Comments (4)

SharePoint 2010: Ribbon Customization – Adding button in Editing Tool Tab

Scenario:

When a user click in Content Editor web part, a button appear in the “Editing Tool -> Insert” tab.

Resolution:

Following XML did the trick and we deploy it as feature.

<CustomAction
Id=Ribbon.Add.Button

Location=CommandUI.Ribbon>

    <CommandUIExtension>

      <CommandUIDefinitions>

        <CommandUIDefinition
Location=Ribbon.WikiPageTab.PubPageActions.Controls._children>

          <Button

          Id=Ribbon.WikiPageTab.PubPageActions.AddLinkButton

          Sequence=22

          Image16by16=/_layouts/images/PPEOPLE.GIF

          Image32by32=/_layouts/images/PPEOPLE.GIF         

          Command=AddLinkButton

          LabelText=Add Link Button

          ToolTipTitle=Add Link Button

          ToolTipDescription=Create link.

          TemplateAlias=o2 />

        </CommandUIDefinition>

        <CommandUIDefinition

        Location=Ribbon.WikiPageTab.Scaling._children>

          <MaxSize

            Id=Ribbon.WikiPageTab.Scaling.PubPageActions.MaxSize

           Sequence=15

            GroupId=Ribbon.WikiPageTab.PubPageActions

            Size=LargeLarge />

        </CommandUIDefinition>

      </CommandUIDefinitions>

      <CommandUIHandlers>

        <CommandUIHandler
Command=AddLinkButton
CommandAction=javascript:AddLinkButton();
EnabledScript=javascript:returningtrue(); />

      </CommandUIHandlers>

    </CommandUIExtension>

  </CustomAction>

Leave a Comment

SharePoint: Get All Possible Values of Choice Column Dynamically

Scenario:

We need to populate an asp DropDownList control with all possible values of a choice column created in a specific SharePoint list.

Resolution:

SPList spList = spWeb.Lists[“ListName”];

SPField spField = spList.Fields[“ColumnName”];

XmlDocument xmlDoc = new XmlDocument();

xmlDoc.LoadXml(spField.SchemaXml);

XmlNodeList nodeList = xmlDoc.SelectNodes(“/Field/CHOICES/CHOICE”);

foreach (XmlNode node in nodeList)

{

    ddl.Items.Add(node.InnerText);

}

Leave a Comment

SharePoint: Associate visual studio workflow with multiple Content Types

Scenario:

We need to associate multiple content types with the custom workflow created in visual studio 2010.

Resolution:

In the elements.xml file look for <AssociationCategories>. Appended with ;#”
among Content Type IDs. Example:

<AssociationCategories>ContentType;ContentTypeID

;#ContentType;ContentTypeID;#

ContentType;ContentTypeID</AssociationCategories>


Leave a Comment

MOSS: Microsoft Office SharePoint Designer 2007 Restore Web Sites Error (Exportsettings.xml)

Exception:

error occured while importing the web http://SiteURL 

Could not find the file ‘C:\WINDOWS\TEMP\f611fafc-73d8-4b48-bc1e-f9ef6d7cb991\Exportsettings.xml’  

Reason: 

Microsoft Office SharePoint Designer 2007 failed to create a valid Content Migration Package (.cmp) for site having size greater than 25MB. Although, you will have a success message for backup but when you try to restore it, you will face the error of “Exportsettings.xml” file. The backup Content Migration Package (.cmp) can’t be restored. 

A typical “Exportsettings.xml” file has the following contents:  

<?xml version=”1.0″ encoding=”utf-8″ ?>

<ExportSettings xmlns:xsi=”http://www.w3.org/2001/XMLSchema-instance xmlns:xsd=”http://www.w3.org/2001/XMLSchema SiteUrl=”http://ServerName/ FileLocation=”PathOfTheBackupFile BaseFileName=”” IncludeSecurity=”None IncludeVersions=”All ExportPublicSchema=”true ExportMethod=”ExportAll ExcludeDependencies=”true xmlns=”urn:deployment-exportsettings-schema“>

<ExportObjects> 

<DeploymentObject Id=”729ad10a-1ebf-48c1-bc95-ab2ffb7f5663 Type=”Web ParentId=”00000000-0000-0000-0000-000000000000 Url=”/URLOfTheSite ExcludeChildren=”false IncludeDescendants=”All” />  

</ExportObjects> 

</ExportSettings> 

The problem is that when “Microsoft Office SharePoint Designer 2007” tries to backup the site, WSS fail to create a valid Content Migration Package (.cmp). When, “Microsoft Office SharePoint Designer 2007” download first or some of the Content Migration Package (.cmp) files, other files are deleted. Thanks to the MOOS recycle bin, all the other (.cmp) files go straight to it. 

Resolution: 

The workaround for this problem requires “Microsoft Cabinet Software Development Kit”. Download Cabsdk.exe before proceeding. 

The first step is to take the backup of the site. (For details, follow the link). We name the Content Migration Package (.cmp) as “test.cmp”.Now when your try to restore the site using Content Migration Package (.cmp) “test.cmp”, you will face the error  

“error occured while importing the web http://SiteURL

Could not find the file ‘C:\WINDOWS\TEMP\f611fafc-73d8-4b48-bc1e-f9ef6d7cb991\Exportsettings.xml’ 

To restore the site, go to the Recycle bin of the site and there you will find the files with extension “.cmp”. Example name are like “D3F44E4819C24ED6AA9F7049E04AA431.cmp”, and “D3F44E4819C24ED6AA9F7049E04AA4311.cmp”, Restore these files from recycle bin. 

Now open / refresh the site in Microsoft Office SharePoint Designer 2007 and you will see all the files at the root of the site. 

The next step is to publish these files on the local folder. Right click on the files and select “Publish Selected File..” as shown in the figure below: 

7-1.jpg

“Remote Web Site Properties” dialog box will appear, select “File System” option and “Browse” to the desired local directory as shown in the figure below:  

7-2.jpg 

Click “Ok” and files will be published at the desired directory. 

Now change the extension of the files from *.cmp to *.cab and unzip to the files to a directory, say,”testdir”. (say path C:\testdir) 

Run Console and move to the bin directory of the “Microsoft Cabinet Software Development Kit”. Run the command  cabarc n test-restore.cab C:\testdir\*.* A cab file with the name test-restore.cab will be created in the bin directory of “Microsoft Cabinet Software Development Kit”. Change the extension of the file from and “*.cab” to “.cmp” and use this file to restore the site. 

In case you may encounter an error, try adding the original back up file “test.cmp” into the “testdir” directory or adding all the files from the site recycle bin into the “testdir” directory.

http://technet2.microsoft.com/Office/en-us/library/288fecfb-53fb-4988-89d7-b7888f82bf961033.mspx?mfr=true

http://www.dotnetjunkies.com/WebLog/mwherman2000/archive/2007/07/26/271409.aspx

http://support.sherweb.com/showfaq.php?idarticle=191&idcat=25

Comments (64)

Add pdf document icon to WSS

First of all, find an appropriate .gif icon for pdf document form internet and copy that image in the Images directory at the path “C:\Program Files\Common Files\Microsoft Shared\Web Server Extensions\60\Template\Images” 

Now open Docicon.xml file found at the path “C:\ \Program Files\Common Files\Microsoft Shared\Web server extensions\60\Template\Xml” or at the path “C:\ Program Files\Common Files\Microsoft Shared\Web server extensions\12\Template\Xml” 

Locate the tag <ByExtension> in the file Docicon.xml and the line <Mapping Key=”pdf” Value=”NameOfTheImage.gif”/>.

Save and close the file. Restart IIS and icon will be added. You can test it by adding a pdf document in the document library. 

http://msdn2.microsoft.com/en-us/library/ms948139.aspx

http://support.microsoft.com/kb/837849

Comments (2)

CREATING AND DEPLOYING FEATURE IN MOSS

Windows SharePoint Services 3.0 introduces an inherently portable and modular functionality known as feature, which provides a mechanism for defining site elements. 

 A feature is a package of Windows SharePoint Services elements that can be activated for a specific scope and that helps users accomplish a particular goal or task. 

 Features are added to a target site or site collection through a process known as feature activation. The element types that can be defined by a feature include menu commands, link commands, page templates, page instances, list definitions, list instances, event handlers, and workflows. 

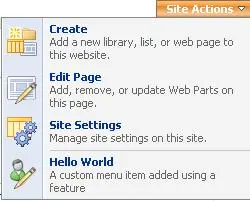
 So let’s start writing a feature. The functionality of the feature which we are going to develop is that it adds a menu item “Hello World” in the “Site Actions” menu. Clicking on the menu item “Hello World” will transfer to Google. Our goal is shown in the figure below:


 6-3.jpg


 The first step is to understand the feature file structure. If you go to “C:\Program Files\Common Files\Microsoft Shared\web server extensions\12\TEMPLATE\FEATURES” directory, you will see features already existed. Each feature has a file “feature.xml” and other file usually named as “elements.xml”. 

 Now we move to VS 2005 and create a new class library DLL project and name it “HelloWorldFea. Now, it will be intelligent to create the same structure of files as that of WSS 3.0 in the VS 2005. 

 Create a directory “TEMPLATE” in the solution. Inside the “TEMPLATE” directory, create another directory “FEATURE” and lastly, in the “FEATURE” directory, create directory with the same name as that of the project which happens to be “HelloWorldFea”. 


6-1.jpg 


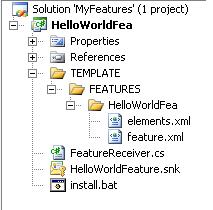
Now, create a xml file and name it “feature.xml” inside the directory “HelloWorldFea”. In this xml file, we will write the details that will define the high level attributes of the features itself. Add the following XML to the “feature.xml” file. 

<Feature 

Id=“” 

Title=HELLO WORLD FEATURE 

Description=This is hello world feature. 

Scope=Web 

Hidden=FALSE 

ImageUrl=menuprofile.gif 

xmlns=http://schemas.microsoft.com/sharepoint/>   

    <ElementManifests>   

         <ElementManifest Location=elements.xml /> 

    </ElementManifests>

</Feature>  

We describe the attributes of the Feature tag as under: 

Id: GUID which identifies the features uniquely. It can be created by clicking “Tools” menu of VS 2005 and then on “Create GUID”. “Create GUID” window will appear. Select “4 Registry Format (ie. (xxxx …))” option. Click on “Copy” button and paste the GUID against the Id attribute. 

Title: Specifies the title of the feature. 

Description: Specifies the description of the feature. 

Scope: Scope defines the context in which feature is activated and deactivated. It can have four values namely Web, Site, WebApplication and Farm. Web specifies that the feature can be activated and deactivated within the context of site. Site specifies that the feature can be activated and deactivated within the context of the site collection. Same stands for WebApplication and Farm. 

Hidden: Can be set to true or false. In case of true, feature is not visible in the list of available features. It can be activated or deactivated through command line, through custom code, or through an activation dependency with another feature. 

ImageUrl: The image displayed next to the feature in the use interface. The last part is ElementManifests element. The element has inner element ElementManifest which specifies the reference of other XML file. This file defines other elements that make up the feature. In our case, we have one file “elements.xml”. 

Create “elements.xml” file in the “HelloWorlFea” directory. The XML for the file is as under: 

<Elements xmlns=http://schemas.microsoft.com/sharepoint/ >  <CustomAction    Id=SiteActionsToolbar     


GroupId=SiteActions   

Location=Microsoft.SharePoint.StandardMenu   

Sequence=100   

Title=Hello World   

Description=A custom menu item added using a feature   

ImageUrl=_layouts/images/menuprofile.gif >   

    <UrlAction Url=http://www.google.com/>     

</CustomAction>

</Elements > 

Id has the name of the menu in which we want to add our menu item. Title and description specifies the text that will appear as title and description. UrlAction states the url of the site where user is redirected when clicked. In our case, it is http://www.google.com. 

The next step is to deploy the feature unto the “FEATURE” directory. For this purpose we create a batch file and name it “deploy.bat”. The contents of the file are: 

@SET TEMPLATEDIR=”C:\Program Files\Common Files\Microsoft Shared\web server extensions\12\TEMPLATE”

@SET STSADM=”C:\Program Files\Common Files\Microsoft Shared\web server extensions\12\BIN\stsadm” 

Echo Copying filesxcopy /e /y TEMPLATE\* %TEMPLATEDIR% 

Echo Installing feature%STSADM% -o InstallFeature -filename HELLOWorldFea\feature.xml -force 

Echo Reatart IIS Worker Process

IISRESET  

In the end, go to the properties of the project and then to “Build Events” tab. Write the following lines in the “post build event command line window:”  

cd $(ProjectDir)

install.bat 

The first line is required to change the current directory to that of the project directory. The second line runs the batch file to copy the feature files to the correct location and install the feature with the InstallFeature operation of the command-line STSADM.EXE utility. Now go to the “Site Features” page by moving from “Site Actions” to “Site Settings” and clicking on “Site Features” of your site. Here, “Hello World Feature” will be available. Activate it and you will be able to see a menu item added in the “Site Actions” menu. If you fail to find the feature, check the following steps: 

  • “HelloWorldFea” directory is added in the FEATURES directory at the path “C:\Program Files\Common Files\Microsoft Shared\web server extensions\12\TEMPLATE\FEATURES”


  • Run the file “feature.xml” and “element.xml” to check that XML is error free.

If still unable to find the feature, try to deploy manually and see what happen. 

http://msdn2.microsoft.com/en-us/library/ms439657.aspx

Source:

http://www.microsoft.com/learning/en/us/book.aspx?ID=9692&locale=en-us

Comments (6)